Hướng dẫn sử dụng plugin Jquery Upload File trong CakePHP 2.0
Chào các bạn,
Hôm nay mình xin giới thiệu các bạn một plugin dùng để upload file rất chuyên nghiệp, đó là Jquery Upload File nó hỗ trợ nhiều chức năng rất phù hợp cho các dự án lớn và nhỏ.
Các bạn có thể download riêng plugin này ở link trên, hoặc nút Download ở cuối bài gồm cả source CakePHP truyện tranh ở các bài trước trong series CakePHP framework
Đầu tiên thì xin nói trước mình không chắc hiểu hết được plugin này, mình chỉ dùng nó vào CakePHP để upload file thôi. Và mình cũng không có lưu cơ sở dữ liệu, hoặc khi nào rảnh mình làm rùi update source code lại.
Việc sử dụng plugin cần điều kiện như sau:
- Download plugin trên về.
- Localhost hoặc server chúng ta có cài đặt 1 trong các library PHP: GD, imagick, ImageMagick kiểm tra nó bằng phpinfo(), việc cài đặt các bạn tìm hiểu trên google nha.
- Source code truyện tranh của mình, bài cuối cùng á.
Bước 1:
Sau khi download plugin về giải nén chúng ta sẽ có thư mục đổi tên thành FileUpload hoặc cái nào bạn thích, rồi copy nó vào /app/webroot/js
Tiếp tục sau khi copy xong vào /app/webroot/js/FileUpload/server/php/, tiếp tục copy file UploadHandler.php vào trong /app/Vendor/file.upload/UploadHandler.php, file.upload là thư mục nếu chưa có thì tạo.
Bước 2:
Controller: vào /app/Controller/PagesController.php tạo ra 3 action: upload, fileupload, delete.
Model: không sử dụng.
View: tạo ra file upload.ctp trong /app/View/Pages/ . Nội dung file này sẽ lấy từ dòng 26-147 của file app/webroot/js/FileUpload/test/index.html, và tiến hành sửa action(chỉ action) của form thành
[html]
<form id="fileupload" action="/pages/fileupload" method="POST" enctype="multipart/form-data">
[/html]
Tiếp theo chúng ta sẽ nhúng các file js vào, các bạn có thể nhúng trực tiếp trong upload.ctp để các page khác không tải những file này, ở đây mình đưa vô head luôn.
[php]
<?php
echo $this->Html->script(array(
‘../template_story/themes/js/jquery-1.7.2.min.js’,
‘../template_story/bootstrap/js/bootstrap.min.js’,
‘../template_story/themes/js/superfish.js’,
‘../template_story/themes/js/jquery.scrolltotop.js’,
‘../template_story/themes/js/jquery.flexslider-min.js’,
‘FileUpload/js/vendor/jquery.ui.widget.js’,
‘FileUpload/js/tmpl.min.js’,
‘FileUpload/js/load-image.all.min.js’,
‘FileUpload/js/canvas-to-blob.min.js’,
‘FileUpload/js/jquery.iframe-transport.js’,
‘FileUpload/js/jquery.fileupload.js’,
‘FileUpload/js/jquery.fileupload-process.js’,
‘FileUpload/js/jquery.fileupload-image.js’,
‘FileUpload/js/jquery.fileupload-validate.js’,
‘FileUpload/js/jquery.fileupload-ui.js’,
));
?>
[/php]
Bước 3:
Tạo thư mục lưu trữ của chúng ta sẽ là uploads trong /app/webroot/img/
Define nó trong app/webroot/index.php
[php]
define(‘UPLOADS_DIR’, ‘uploads’);
[/php]
Bước 4:
Với các bước trên chúng ta đã tạo ra các file và nội dung cần thiết. Ở bước này sẽ thêm js để plugin tự động upload hình, xoá hình ảnh khi nhấn Delete, chỉnh sửa action trong controller Pages.
Ở file /app/View/Pages/upload.ctp thêm đoạn js dưới đây:
[html]
<script type="text/javascript">
$(function () {
‘use strict’;
//Part 1
$(‘#fileupload’).fileupload({
url : "/pages/fileupload",
dataType: ‘json’,
autoUpload: true,
acceptFileTypes: /(\.|\/)(gif|jpe?g|png|pdf)$/i,
maxFileSize: 99900000000,
disableImageResize: /Android(?!.*Chrome)|Opera/
.test(window.navigator.userAgent),
previewMaxWidth: 100,
previewMaxHeight: 100,
previewCrop: true,
sequentialUploads: true,//tai file len tuan tu
}).bind(‘fileuploadadd’, function (e, data) {
console.log(data);
}).on(‘fileuploadprogressall’, function (e, data) {
var progress = parseInt(data.loaded / data.total * 100, 10);
$(‘#progress .progress-bar’).css(
‘width’,
progress + ‘%’
);
}).prop(‘disabled’, !$.support.fileInput)
.parent().addClass($.support.fileInput ? undefined : ‘disabled’);
//Part 2
$(‘.files’).on(‘click’, ‘button’, function (e) {
e.preventDefault();
var $link = $(this);
$.ajax({
url: $link.data(‘url’),
dataType: ‘json’,
success: function(r){
console.log(r);
}
})
});
//Part 3
// Load existing files:
$(‘#fileupload’).addClass(‘fileupload-processing’);
$.ajax({
url: $(‘#fileupload’).fileupload(‘option’, ‘url’),
dataType: ‘json’,
context: $(‘#fileupload’)[0]
}).always(function () {
$(this).removeClass(‘fileupload-processing’);
}).done(function (result) {
//alert(JSON.stringify(result));
console.log(result);
$(this).fileupload(‘option’, ‘done’).call(this, $.Event(‘done’), {result: result});
});
});
</script>
[/html]
Trong đoạn js trên có 3 part:
- part 1 là part chính để cấu hình các chức năng upload như: url(action để submit form), tự động(autoUpload), các file được upload(acceptFileTypes), dung lượng file tối đa(maxFileSize)… có cả hiển thị thanh tiến trình upload file.
- part 2 là sử dụng để xoá file ứng với action delete trong PagesController.php
- part 3 sử dụng để load các file đang có trong thư mục uploads
PagesController.php
Với action upload không cần làm gì cả.
action fileupload:
[php]
public function fileupload(){
$this->layout = "ajax";
App::import("Vendor", "UploadHandler", array("file"=> "file.upload/UploadHandler.php"));
$options = array(
‘script_url’ => Router::url(),
‘upload_dir’ => IMG_DIR . DS . UPLOADS_DIR . DS,
‘upload_url’ => Router::url("/". IMG_DIR . DS . UPLOADS_DIR . DS, true),
);
$upload_handler = new UploadHandler($options);
switch ($_SERVER["REQUEST_METHOD"]) {
case ‘GET’:
case ‘HEAD’:
$upload_handler->get();
break;
case ‘POST’:
$upload_handler->post();
break;
case ‘DELETE’;
$upload_handler->delete();
break;
default:
$this->header(‘HTTP/1.1 405 Method Not Allowed’);
break;
}
exit;
}
[/php]
- App::import dùng để sử dụng Vendor trong CakePHP nha
- $option mình cấu hình lại 3 giá trị, các giá trị này đã được cấu hình trong UploadHandler.php chỉnh lại cho phù hợp với nhu cầu của bạn, 3 giá trị mình chỉnh sửa nó ảnh hưởng trực tiếp đến url hiển thị ảnh và nơi lưu trữ ảnh được upload.
- trong mệnh đề switch sẽ tuỳ theo phương thức nào để gọi phương thức đó trong UploadHandler.php
action delete: nó đơn giản là get tên tấm ảnh được truyền qua với biến file và tiến hành xoá nó đi.
[php]
public function delete(){
$this->layout = "ajax";
$this->autoRender = false;
if($this->RequestHandler->isAjax()){
$filename = $this->request->query[‘file’];
@unlink(WWW_ROOT . IMG_DIR .DS . UPLOADS_DIR . DS .$filename);
@unlink(WWW_ROOT . IMG_DIR .DS . UPLOADS_DIR . DS ."thumbnail". DS .$filename);
$result = array("filename"=> $filename);
return json_encode($result);
}
}
[/php]
File /app/Vendor/file.upload/UploadHandler.php
Nội dung chính của plugin chúng ta sử dụng ở đây, gồm tất cả các cấu hình cần thiết, và trong Controller mình đã sửa 3 giá trị lại. Mình còn sửa lại trong file này là :
[php]
protected function set_additional_file_properties($file) {
$file->deleteUrl = Router::url("/pages/delete", true)
.$this->get_query_separator($this->options[‘script_url’])
.$this->get_singular_param_name()
.’=’.rawurlencode($file->name);
$file->deleteType = $this->options[‘delete_type’];
if ($file->deleteType !== ‘DELETE’) {
$file->deleteUrl .= ‘&_method=DELETE’;
}
if ($this->options[‘access_control_allow_credentials’]) {
$file->deleteWithCredentials = true;
}
}
[/php]
Đây là hàm để cấu hình url xoá hình ảnh khi nhấn nút Delete.
Ở file này còn chú ý các option trên đâu file: image_library có 3 giá trị (0: GD library, 1: use imagick, 2: ImageMagick) các option khác có thể mặc định.
Vì bên PagesController.php mình gọi trực tiếp các phương thức Get, post,… nên ở file này mình cũng ẩn đi đoạn
[php]
// if ($initialize) {
// $this->initialize();
// }
[/php]
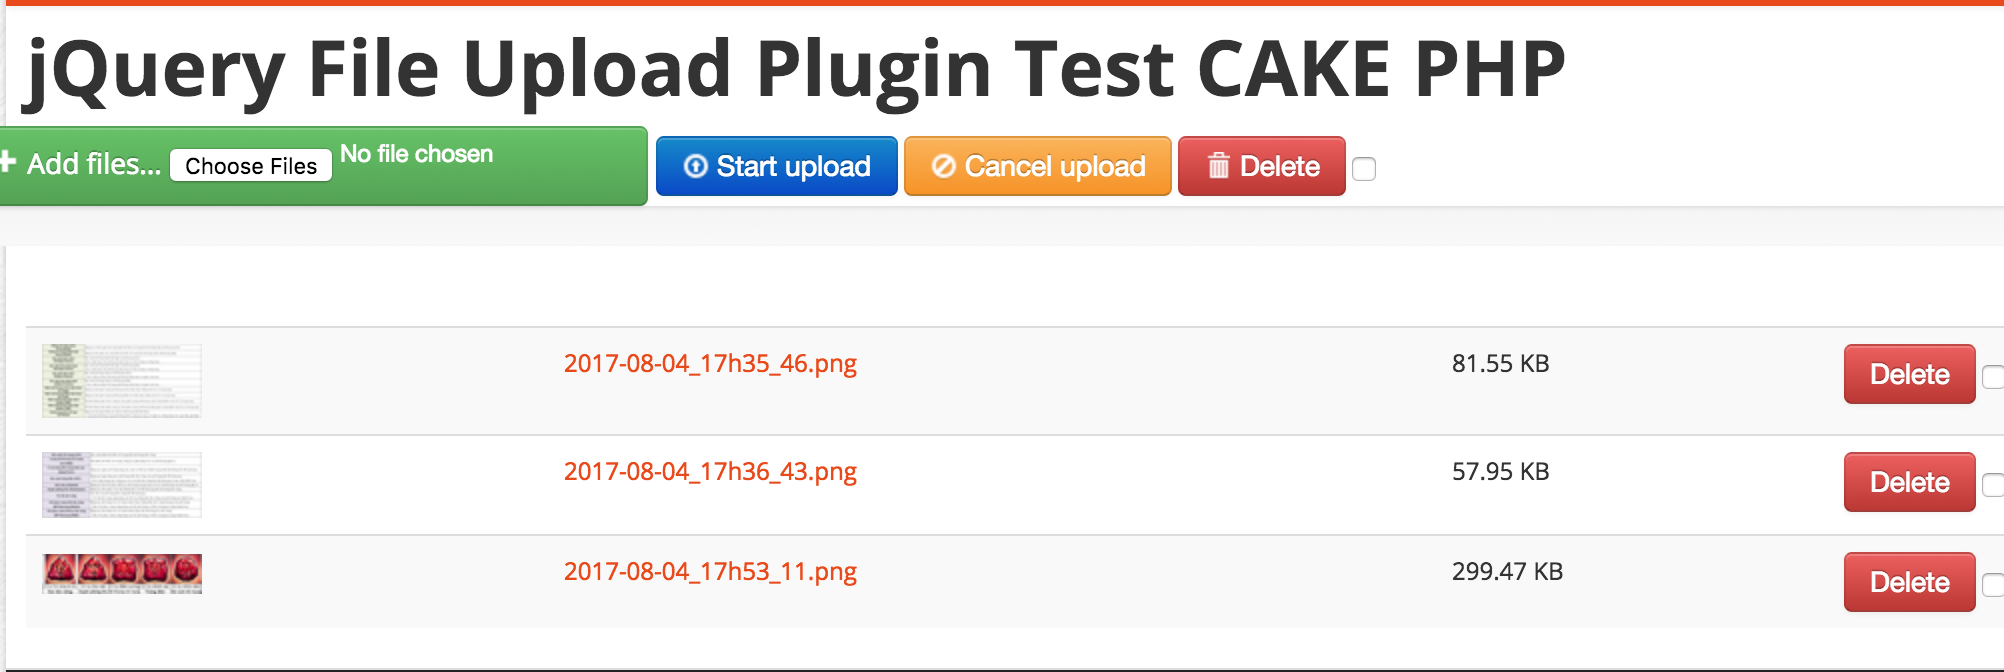
Thành quả sau khi upload.
[create_button_post thamso1=” thamso2=’Demo’ thamso3=’http://nongdanit.info/download/cakephp/jqueryuploadfile/doctruyen.zip’] [/create_button_post]
[thongbao]
- Nếu có thắc mắc gì các bạn để lại comment bên dưới mình sẽ trả lời sớm nhất có thể.
- Cảm ơn các bạn đã đọc.
[/thongbao]
Comments are closed.